Friday, September 18, 2015
Wednesday, September 16, 2015
Finish and Post your Banner
First you have to flatten the image. LAYER>FLATTEN
Select an area with the TYPE TOOL, select the font, size, alignment, etc. Type your name or the title of your blog with the Horizontal Type Mask, or the Horizontal Type Tool.
Crop your banner.
When you are satisfied with your design, SAVE AS your file as a PSD (Photoshop Document).
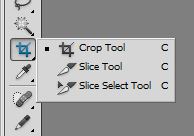
Use the CROP TOOL to crop the banner to a size that works in Google. WIDTH: 1000px HEIGHT: 120px RESOLUTION: 72dpi in the option bar at the top of the file.
LAYER> FLATTEN your file and then SAVE AS a JPG. (Joint Photographic Experts Group). You cannot post PSDs to your blog.
Once you are finished, add your banner to your blog. In Settings>Layout>Heading (Edit)> Browse for your file.
Monday, September 14, 2015
More Photoshop Tricks: Adding Filters
So we have created the Wordle with the 100 words about yourself to create your banner. Now we are going to experiment with some filters that may emphasize something about you.
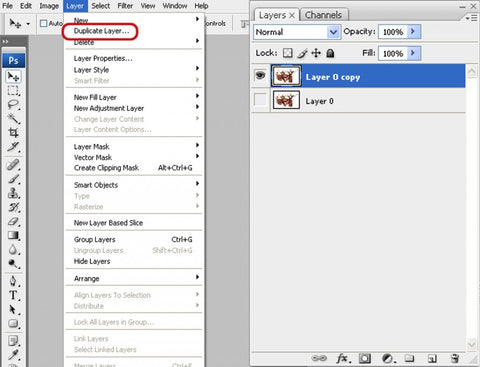
>LAYER> DUPLICATE a layer on your layers pallet.
>SELECT the LAYER where the image that you want to effect is on (it should be highlighted in blue).
> FILTER try/experiment with a filter and see what happens to a new layer each time:
OR
> Use the MARQUEE TOOL [top of your tool bar] to SELECT a part of your image that you don't want and DELETE it. [to de-select- SELECT menu bar> DESELECT].
experiment, play and have fun...
>LAYER> DUPLICATE a layer on your layers pallet.
>SELECT the LAYER where the image that you want to effect is on (it should be highlighted in blue).
> FILTER try/experiment with a filter and see what happens to a new layer each time:
- Blur-Gaussian Blur
- Stylize- Find Edges
- Brush Stroke- Accented Edges
OR
> Use the MARQUEE TOOL [top of your tool bar] to SELECT a part of your image that you don't want and DELETE it. [to de-select- SELECT menu bar> DESELECT].
| Marquee Tool |
experiment, play and have fun...
Friday, September 11, 2015
Photoshop/Wordle Banner
- We are going to personalize your blog some more.
- Using Internet Explorer
- Open Wordle: http://www.wordle.net/
- Type or copy/paste the write-up about you into the "CREATE".
- Try different colours, fonts, layouts, arrangements.
For this assignment, I would rather you start simple with WORDLE.
- Once you have your Wordle the way you want it, then Save as "PNG" into your file.
- Then open your Wordle it in Photoshop.
- Go to the start menu on the lower left side of your screen.
- Click All Programs> Adobe Design Premium> Adobe Photoshop
- Open FILE [top left pop down menu]> OPEN>
- Fine file in "Computer" > student account/guest account.
- Open the >WINDOW menu, click on >LAYER to open layer pallet.
- Open the >LAYER pop down menu on the top of the window> DUPLICATE LAYER.
- Lower the opacity of the new layer copy.
- Then use the "MOVE" tool on the tool bar to shift, spin:
Monday, January 26, 2015
Link Scavenger Hunt
<html>
<head> <title> donna's web sites </title>
</head>
<body>
<h1>My Web Sites</h1>
<hr>
<p>Here are some of my chosen web sites- <em>check them out:</em> </p>
<ol>
<li><a href=”http://www.the1staddress.com”>clickhere</a> </li>
</ul>
<a href=mailto:donna.usher@home.com>click here to contact me</a>
</body>
</html>
List of 10 sites:
</head>
<hr>
<p>Here are some of my chosen web sites- <em>check them out:</em> </p>
<li><a href=”http://www.the1staddress.com”>clickhere</a> </li>
<a href=mailto:donna.usher@home.com>click here to contact me</a>
</html>
List of 10 sites:
- browser
- map site/travel site
- music site
- video site
- weather
- news source
- an amazing site
- a terrible site
- html tutorial
- choice
Wednesday, January 21, 2015
HTML Vocabulary
We are going to work on HTML vocabulary to further develop your ability to control the design and organization of your web page.
First use one of your self-portrait images photoshop. Open your image and reduce your resolution to lower the overall size of your image, it must be in RGB. Save your image to your "WEB" folder.
Headings: Are bold, bigger and move the next sequence of text to the next line <H1 > the biggest</H1 > to <H6 > the smallest</H6 >.
Text Colour: <font color="blue" >
Text Style: <font face="Arial" >
Text Size: <font size="+1" >
Hexidecimal Colour Code: RR GG BB put a number sign in front and numbers 1-9 or letters A-F to represent the colour. Here is a hexidecimal colour chart.a better hex chart.
A line of text: <p > and you have to close with </p >
Text Alignment: <div align="right" > or you can align it in the centre </div >
Line Break: <br > is a break to another line, no closing tag required
Image: <img src="name_of_your_photo" >
Link to another page, relative URL= <a href="page2.html" > type something to click on here</a>
Link to another site on the internet, absolute URL= <a href="http://www.website" > type something to click on here</a>
Tags within the opening "BODY" tag
Link tags to change the colour of your links use these attributes in the <body> tag:
link= change the link colour
alink= changes the link colour when you are clicking on it
vlink= changes the colur of your link after you have visited it
bgcolor= changes the colour of your page
background= changes the image on the background of your page
Lists
Numbered List <ol >
Buletted List <ul >
You need to put a <li > before and after each item on te list </li >
then close the ul or ol </ol > or </ul >
First use one of your self-portrait images photoshop. Open your image and reduce your resolution to lower the overall size of your image, it must be in RGB. Save your image to your "WEB" folder.
Headings: Are bold, bigger and move the next sequence of text to the next line <H1 > the biggest</H1 > to <H6 > the smallest</H6 >.
Text Colour: <font color="blue" >
Text Style: <font face="Arial" >
Text Size: <font size="+1" >
Hexidecimal Colour Code: RR GG BB put a number sign in front and numbers 1-9 or letters A-F to represent the colour. Here is a hexidecimal colour chart.a better hex chart.
A line of text: <p > and you have to close with </p >
Text Alignment: <div align="right" > or you can align it in the centre </div >
Line Break: <br > is a break to another line, no closing tag required
Image: <img src="name_of_your_photo" >
Link to another page, relative URL= <a href="page2.html" > type something to click on here</a>
Link to another site on the internet, absolute URL= <a href="http://www.website" > type something to click on here</a>
Tags within the opening "BODY" tag
Link tags to change the colour of your links use these attributes in the <body> tag:
link= change the link colour
alink= changes the link colour when you are clicking on it
vlink= changes the colur of your link after you have visited it
bgcolor= changes the colour of your page
background= changes the image on the background of your page
Lists
Numbered List <ol >
Buletted List <ul >
You need to put a <li > before and after each item on te list </li >
then close the ul or ol </ol > or </ul >
Basic HTML
We are going to learn how to make basic web pages using HTML. There are many HTML tutorials that you can explore. http://www.lissaexplains.com/ is a good one; it looks kind of childish, but easy to follow. HTML glossary is nicely organized, and HTML Tutorial is a good one too.
<head>
<title>Choose your own site title, and type it in here.</title>
</head>
<body>
Everything that appears on your site will be entered here (text, images etc.), between the body tags.
</body>
</html>
- Create a "Webpage" folder in your Design folder.
- Open "Note Pad" in the Start menu- Accessories-Note Pad.
- Type the following:
<head>
<title>Choose your own site title, and type it in here.</title>
</head>
<body>
Everything that appears on your site will be entered here (text, images etc.), between the body tags.
</body>
</html>
Then save as "my_1st_webpage.html". (Make sure you include the extention ".html")
Open Internet Explorer File- Open- Browse for the file in your folder.
Subscribe to:
Posts (Atom)