easily-add-elements-using-photoshop
Photoshop-a-beginners-tutorial
https://digital-photography-school.com/how-to-blend-in-adjustments-using-layer-masking-in-photoshop/How-to-blend-in-adjustments

Thursday, September 28, 2017
Photoshop Intro
The Toolbar
We're not going to take a look at every single tool but we are going to look at almost every one of them. While this overview will give you an idea of what each tool does, go find a photo and start playing around with it.
Move Tool (Keyboard: V)
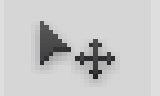
The move tool simply lets you move objects in a given layer around the Photoshop canvas. To use it, click anywhere on the canvas and drag. As you drag, the Photoshop layer will move with your mouse.
Marquee (Keyboard: M)
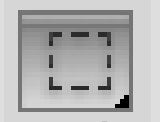
The marquee lets you select part of the canvas in a specific shape. By default you get a rectangular (or perfect square if you hold down shift while selecting), but you can also select in the shape of an ellipse (or a perfect circle if you hold down shift while selecting).
Lasso (Keyboard: L)
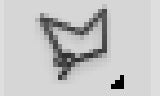
The lasso is a free-form selection tool that lets you drag around the canvas and select anything the lasso'd area covers. Within this tool you also have access to the polygonal lasso, which lets you create a selection by clicking around on the canvas and creating points, (make sure to go back to the exact point where you began to select/or press ESC).
We're not going to take a look at every single tool but we are going to look at almost every one of them. While this overview will give you an idea of what each tool does, go find a photo and start playing around with it.
Move Tool (Keyboard: V)
The move tool simply lets you move objects in a given layer around the Photoshop canvas. To use it, click anywhere on the canvas and drag. As you drag, the Photoshop layer will move with your mouse.
Marquee (Keyboard: M)
The marquee lets you select part of the canvas in a specific shape. By default you get a rectangular (or perfect square if you hold down shift while selecting), but you can also select in the shape of an ellipse (or a perfect circle if you hold down shift while selecting).
Lasso (Keyboard: L)
The lasso is a free-form selection tool that lets you drag around the canvas and select anything the lasso'd area covers. Within this tool you also have access to the polygonal lasso, which lets you create a selection by clicking around on the canvas and creating points, (make sure to go back to the exact point where you began to select/or press ESC).
The magnetic lasso, which works the same as the regular lasso but attempts to detect edges for you and automatically snap to them.
Magic Wand (Keyboard: W)
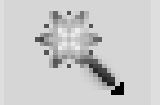
Clicking an area with the magic wand will tell Photoshop to select the spot you clicked on and anything around it that's similar. This tool can be used as a crude way to remove backgrounds from photos.
Magic Wand (Keyboard: W)
Clicking an area with the magic wand will tell Photoshop to select the spot you clicked on and anything around it that's similar. This tool can be used as a crude way to remove backgrounds from photos.
Crop Tool (Keyboard: C)
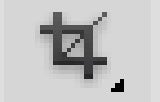
The crop tool is used to (surprise!) crop your pictures. You can specify the exact size and constrain the crop tool to those proportions, or you can just crop to any size you please.
Eyedropper (Keyboard: I)
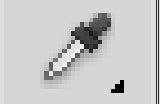
The eyedropper tool lets you click on any part of the canvas and sample the color at that exact point. The eyedropper will change your foreground color to whatever color it sampled from the canvas.
Healing Brush (Keyboard: J)
The healing brush lets you sample part of the photograph and use it to paint over another part. Once you're finished, Photoshop will examine surrounding areas and try to blend what you painted in with the rest of the picture.
Paintbrush and Pencil (Keyboard: B)
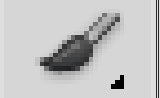
The paintbrush is a tool that emulates a paintbrush and the pencil is a tool that emulates a pencil. The paintbrush, however, can be set to many different kinds of brushes. You can paint with standard paintbrush and airbrush styles, or even paint with leaves and other shapes as well.
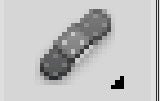
Clone Stamp (Keyboard: S)
Like the healing brush, the clone stamp lets you sample part of the photograph and use it to paint over another part. With the clone stamp, however, that's it. Photoshop doesn't do anything beyond painting one area over a new area. To copy an area, press "Alt" and then left click the chosen area, Then go to the part where yo
History Brush (Keyboard: Y)
The history brush lets you paint back in time. Photoshop keeps track of all the moves you make (well, 50 by default) and the history brush lets you paint the past back into the current photo. Say you brightened up the entire photo but you wanted to make a certain area look like it did before you brightened it, you can take the history brush and paint that area to bring back the previous darkness.
The crop tool is used to (surprise!) crop your pictures. You can specify the exact size and constrain the crop tool to those proportions, or you can just crop to any size you please.
Eyedropper (Keyboard: I)
The eyedropper tool lets you click on any part of the canvas and sample the color at that exact point. The eyedropper will change your foreground color to whatever color it sampled from the canvas.
Healing Brush (Keyboard: J)
The healing brush lets you sample part of the photograph and use it to paint over another part. Once you're finished, Photoshop will examine surrounding areas and try to blend what you painted in with the rest of the picture.
Paintbrush and Pencil (Keyboard: B)
The paintbrush is a tool that emulates a paintbrush and the pencil is a tool that emulates a pencil. The paintbrush, however, can be set to many different kinds of brushes. You can paint with standard paintbrush and airbrush styles, or even paint with leaves and other shapes as well.
Clone Stamp (Keyboard: S)
Like the healing brush, the clone stamp lets you sample part of the photograph and use it to paint over another part. With the clone stamp, however, that's it. Photoshop doesn't do anything beyond painting one area over a new area. To copy an area, press "Alt" and then left click the chosen area, Then go to the part where yo
History Brush (Keyboard: Y)
The history brush lets you paint back in time. Photoshop keeps track of all the moves you make (well, 50 by default) and the history brush lets you paint the past back into the current photo. Say you brightened up the entire photo but you wanted to make a certain area look like it did before you brightened it, you can take the history brush and paint that area to bring back the previous darkness.
Eraser Tool (Keyboard: E)
The erase tool is almost identical to the paintbrush, except it erases instead of paints.
Paint Can and Gradient Tools (Keyboard: G)
The paint can tool lets you fill in a specific area with the current foreground color. The gradient tool will, by default, create a gradient that blends the foreground and background tool (though you can load and create preset gradients as well, some of which use than two colors).
Blur, Sharpen, and Smudge Tools (Keyboard: None)
All three of these tools act like paintbrushes, but each has a different impact on your picture. The blur tool will blur the area where you paint, the sharpen tool will sharpen it, and the smudge tool will smudge the area all around the canvas. The smudge tool is very useful in drawing for creating nicely blended colors or for creating wisps and smoke that you can add to your photos.
Burn, Dodge, and Sponge Tools (Keyboard: O)
The burn, dodge, and sponge tools are paintbrush-like tools that manipulate light and color intensity. The burn tool can make areas in your photo darker. The dodge tool can make them lighter. The sponge tool can saturate or desaturate color in the area you paint with it. These are all very useful tools for photo touch ups.
Pen Tool (Keyboard: P)
The pen tool is used for drawing vector graphics. It can also be used to create paths that can be used for various things that we'll discuss in a later lesson (although if you watch the video you can see a type path being created).
Type Tool (Keyboard: T)
The type tool lets you type horizontally. Tools hidden beneath the horizontal type tool will let you type vertically and also create horizontal and vertical text masks.
Path Tool (Keyboard: A)

The path tool lets you move any created paths around. It's like the move tool, but for paths.
Shape Tool (Keyboard: U)

The shape tool lets you create vector rectangles, rounded rectangles, circles, polygons, lines, and custom shapes. These tools are very useful when designing or when creating shape masks for photos.
Hand Tool (Keyboard: H)
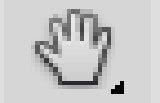
The hand tool allows you to click and drag around the Photoshop canvas. If the entire canvas currently fits on the screen, this tool won't do anything. This tool is for easily navigating around when you're zoomed in, or a picture is simple too big to fit on the screen at 100%.
Zoom Tool (Keyboard: Z)

The zoom tool lets you zoom in and out of the Photoshop canvas by clicking on a given area. By default, the zoom tool only zooms in. To zoom out, hold down the option key and use the zoom tool as you normally would.
Color Selection Tools (Keyboard: D for defaults, X to switch foreground and background colors)
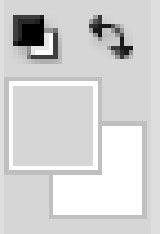
These tools let you manage the colors you're using. The color on top is the foreground color and the color in back is the background color. The foreground color is what your brushes will use. The background color is what will be used if you delete something from the background or extend it (although now, Photoshop CS5 will give you the option for using your foreground color instead in some circumstances). The two smaller icons up top are shortcut functions. The left one, showing a black square on a white square, will set your foreground and background colors to the defaults (Keyboard: D). The double-headed curved arrow will swap your foreground and background color (Keyboard: X). Clicking on either the foreground or background color will bring up a color picker so you can set them to precisely the color you want.
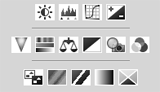
Palettes
Palettes are the things that you see sitting over on the right side of your screen. They make it easy for you to navigate through your document, add adjustments, switch modes, and other things.

Layers
The layers palette lets you see all the layers in your document. As you start getting to know Photoshop, you'll find yourself in this palette more than any other. It'll let you organize and arrange your layers, set blending modes, set visibility and opacity of layers, group and merge layers, and a bunch of other neat things we'll learn about in future lessons.
Adjustments
Your adjustments panel is where you can easily create and edit adjustment layers. Adjustment layers are non-destructive image alterations that affect all the layers below them and can easily be turned on and off. Their most common use is for color correction (namely the Levels and Curves adjustments, but there are many different kinds of adjustments you can perform that can dramatically alter the look of your image.
Color Channels
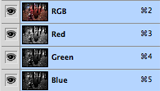
The color channels palette will let you look at the specific colors that make up your picture. If you're in RGB mode you'll get red, green, and blue. These color channels will differ if you're in a different color space (such as CMYK or LAB). When you choose a specific color, you'll notice you'll be shown your image in different versions of black and white. This is because each color channel is simply a monochromatic images representing the light in each channel (e.g. the red channel is just a look at the red light in your photo). Switching between these different channels is useful for making color channel-specific touch ups, overall contrast enhancements, and also for converting your photo to black and white in a compelling way. This will be discussed in greater detail in a later lesson about color correction and photo enhancements.
Color Picker
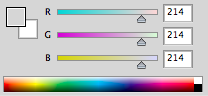
This palette will let you easily alter your foreground and background colors using sliders.
Color Swatches
The color channels palette will let you look at the specific colors that make up your picture. If you're in RGB mode you'll get red, green, and blue. These color channels will differ if you're in a different color space (such as CMYK or LAB). When you choose a specific color, you'll notice you'll be shown your image in different versions of black and white. This is because each color channel is simply a monochromatic images representing the light in each channel (e.g. the red channel is just a look at the red light in your photo). Switching between these different channels is useful for making color channel-specific touch ups, overall contrast enhancements, and also for converting your photo to black and white in a compelling way. This will be discussed in greater detail in a later lesson about color correction and photo enhancements.
Color Picker
This palette will let you easily alter your foreground and background colors using sliders.
Color Swatches
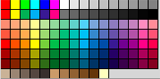
The color swatches palette is a set of pre-defined colors you can quickly choose from. You can load in several other pre-made swatch collections or create your own, too.
History
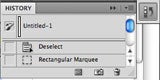
The history palette lets you go back in time to undo any previous alterations. The standard undo command (in the edit menu) will simply toggle between undoing and redoing the latest action performed on your image. The history panel is where you can go back much further (50 actions by default).
Text
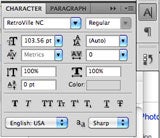
The text palette, and the paragraph palette below it, let you make all sorts of adjustments to any text you create with the type tool. These options are very similar to what you'll find in a word processing, but you can also specify things like character width and spacing which are more useful in design.
Menus
 Most of what you'll find in Photoshop's menus can be found using the previously discussed tools. Nonetheless, we're going to take a quick look at some notable items in each of the menus.
File
File, as usual, handles opening, saving, and closing operations. Towards the end of these lessons we'll be taking a look at your different saving options (namely Save for Web).
Most of what you'll find in Photoshop's menus can be found using the previously discussed tools. Nonetheless, we're going to take a quick look at some notable items in each of the menus.File
File, as usual, handles opening, saving, and closing operations. Towards the end of these lessons we'll be taking a look at your different saving options (namely Save for Web).
Edit
Edit, as usual, brings you copy, cut, and paste. In Photoshop, it's also where you transform layers and set your color spaces.
Image
Image brings you canvas and image adjustments, including destructive effects that you'll also find in your adjustments palette. Options in this menu are designed to affect the image as a whole, although many adjustments are applied to only a single layer.
Layer
Layer lets you do all of the things you can do in the layer palette with a few more options. This menu also lets you create adjustment layers and smart objects (a group of layers treated as a single object).
Select
While the marquee and lasso tools will be your main means of selecting things, the select menu can help you refine that selection or create entirely new selections based on certain criteria (such as color range and luminosity).
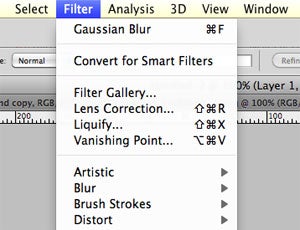
Filter
Filter brings you a wealth of built-in (and, if installed, third-party) Photoshop filters that can blur, sharpen, distort, and alter your image (or layers of the image) in many different and unique ways. The best way to get acquainted with these filters is to try them all. That can take a little time, but it's fun to play around with them and see what they do. We'll be getting into the specifics in subsequent lessons, but only looking at a few commonly useful filters.
View
View provides you with various view options, lets you hide and show line guides you've created (see video for an example), and make Photoshop snap (or not snap) to corners, edges, and to the grid on the canvas. Viewing of this invisible grid can also be turned on and off in the View menu.
Window
Window lets you hide and show certain windows and palettes. You can also arrange your Photoshop windows and palettes however you want and save them as a window preset.
That's all for today! In the next lesson we'll be learning about color correction, touch-ups, and photo enhancement.
You can contact Adam Dachis, the author of this post, at adachis@lifehacker.com.
Monday, September 11, 2017
Shape Name Design

- Open Adobe Illustrator.
- Start a new letter sized document
- Using the T [Type Tool], draw a text box and type your name with a sans serif font. All UPPER CASE.
- If your name is short, include your first and last name.
- Open the "Character" Option box.
- Highlight your name using the "T" tool.
- Explore the Text tool options. Tracking, kerning, letter height/width etc.
- Create a new layer and explore the elements of design [colour, line, shape] within your name.
- Using the Pen tool, Trace/Outline parts of the letter of your name.
- Explore the shape of the letters. De-form and re-form the letters.
- Experiment with shapes.
- Explore line, gap, and the relationships between each curve.
- Convert the solid into elemental parts.
- Play with colours, fills, and outlines.
- Have fun, be creative...
Tuesday, September 5, 2017
About Me
Write a short out line about yourself:
Introduce you-
Who are you? Where do you live/house? apartment? 2 homes? farm? Are you an international student? Do you live with a homestay family? Introduce your family. Do you have siblings? Pets?
Interests/hobbies-
What do you do in your spare time? What's your major? What do you want to do things you have yet to try...
Dream/Nightmare
Describe a dream or a nightmare that you remember. We are going to use this as inspiration for one or two assignments.
Interests In Computer Art-
What do you want to learn this semester? What experiences do you have with computers?
Post an image or drawing that represents something about you.
Subscribe to:
Posts (Atom)