Find a Photoshop effect that you want to try- post images that you want to try to the blog.
Find a tutorial to help you create the effect and to develop your Photoshop skills.
Post the URL to your blog too.
Rate the tutorial 1-5. Critique how the tutorial is helpful or confusing.
Post your progress at the end of each class and write notes about how you are doing. Make sure to add images to show what you have accomplished.
Here are a couple of tutorials for starters:
Basic Photoshop Editing Tutorials:
Quick Start Guide to Photoshop #1- Phlearn
Quick Start Guide to Photoshop #2- Phlearn
learn-the-basics-of-photoshop-in-under-25-minutes
5 Photoshop Mistakes
Double Exposure Tutorials:
design.tutsplus.com
500px.com
photoshopcafe.com
Levitation:
levitation-photography-tutorial/
Randomness:
Phlearn
Digital Rev

Friday, December 13, 2019
Thursday, November 28, 2019
10 Self-directed progress report
The Process
The Results
Finally... Semester Review
Write a reflection on your process for the term:
What have your learned?
What have you struggled with?
Any additional comments?
- Describe your process- write notes while you are learning the program/how to do or teach others. Post an update of your progress each class. Post reflections, what have your learned? Post images. Consider goals of what's next... how are you challenging yourself?
The Results
- Post your work in progress and finished work.
- Reflect on your process- Did you achieve your anticipated results? how well did you do? Give your self a mark and explain why you are giving it to yourself.
- What's next...
Finally... Semester Review
Write a reflection on your process for the term:
What have your learned?
What have you struggled with?
Any additional comments?
Tuesday, November 26, 2019


Monday, November 25, 2019
Surreal Photoshop
 |
| Eric Johansson |
You are to create a surreal image combining two distinctly different photographs to make one believable image. For this project you are to play with scale and the juxtaposition of two image to give an illusion of a make-believe world of giants and little things.
Here are some inspirations:
http://www.erikjohanssonphoto.com/https://www.ted.com/talks/erik_johansson_impossible_photography
https://mymodernmet.com/surreal-photography-luisa-azevedo/
surreal-photos-alter-perspectives-of-scale-being-and-conciseness
Surreal Scale Photoshop- Step by Step Tutorial
create-a-surreal-miniature-portrait-post-production tutorial
There are images to follow this tutorial in the share folder, but you need to create your own combination of images with your own surreal image.
You can find royalty free images here:
https://www.pexels.com/
https://pixabay.com/
https://unsplash.com/
Step 1
Open up the two background images and place them into the same document as layers.
Step 2
Make sure the image of the pressed key is on the top layer. You can either click and drag the layer on top of the other in the Layers panel, or use Command/Ctrl-[ or Command/Ctrl-] to move the layers up and down. I chose to name the bottom layer BG, and the layer above it BG - finger. It should look like this:
Step 3
Create a Layer Mask for the BG-Finger layer. The Mask button is located at the bottom of the Layers panel.

2. Place the Model
After masking out the finger, you should now have a nice clean image of the piano and lowered key. It is now time to start placing the model.Step 1
Open up the model file and paste it into the document. This will create its own layer. Make sure it is the top layer. Name it Model
Step 2
Use the Quick Selection (W) tool and start to select the model's figure. There are many different ways to select and isolate objects in Photoshop, but for this tutorial, I will show you the Quick Selection and Refine Edge way. Feel free to use the method you are most comfortable with.
Step 3
As you continue to select the model's figure, the Quick Selection tool might accidentally grab some background, as well. This is normal. To fix this, make your brush a bit smaller and use the Alt/Opt button to control the plus and minus for the selection. Your selection should look like this.
Step 4
Once your selection is complete, click on the Refine Edge button that is located just above the image.
Note: You must have the Quick Selection tool active for this button to appear.

Step 5
Refine Edge will open up a menu with a bunch of options. Starting from the top, change your view to On Layers. Select Smart Radius and bring it up to about 3 or 4 pixels. Smooth the edge by about 20. Select Decontaminate Colors and ouptut to New Layer with Layer Mask. Click OK.
Step 6
Once you click ok, you will see that you will have a copy of the model, and that layer will have given you a mask of your selection. This method will sometimes leave some areas that need some touching up. No problem. Zoom in and use a hard brush with 100% Opacity, and with the layer mask selected, simply paint away the excess like you did in the very first step.
3. Resize and Position the Model
Step 1
Select your model layer and press Command/Ctrl-T (free transform). You will see a box form around the model. While holding Shift, click and drag one of the corners down until the model is the appropriate size. Hit enter.
Step 2
Place the model in the appropriate spot at the end of the key.
4. Apply a Shadow to the Model
Step 1
For this to look realistic, we need to add a shadow behind the model, but first we need to mask out a bit of the model's leg so that it appears to be behind the key. Pick a small, hard round brush and paint away some of the thigh.
Step 2
Create a new layer Command/Ctrl-Shift-N and name it Shadow. Using a medium-hard brush, black with 100% Opacity, paint a rough black shape that will resemble where the shadow would fall. Don't worry about it being perfect and don't worry about overlapping things. There are tons of ways to create shadows, but this way is very simple and easy.
Step 3
Soften the edges of the shadow by either going to Filter > Blur > Gaussian Blur or using a soft brush and masking around the edges. I chose to blur it around 16 pixels.
Step 4
Add a mask to this layer and using a soft brush, begin to refine the shadow. Make sure your brush is black, and a low opacity of 10-30%. Pay close attention to the outline of the key beside the model and the leg area. Space that is directly beside the model should be almost completely black and should smoothly fade out. Keep working on it until it starts to look like this.
5. Colour Effects and Final Output
This is where you can be creative and export the final photo with your own colouring style. These last few steps show how I finalized this image.Step 1
Create a Gradient Map adjustment layer. Make sure your foreground colour is black, and background colour is white. This will make your image completely black and white. Change the Opacity to 40-50% to dial it back a bit and make the image a nice moody, unsaturated scene.

Step 2
Next, create a Curves adjustment layer and match the curve points to how I have it in the photo. This will make your photo look really dark, don't worry that's normal.

Step 3
Use your Brush (B) tool and make a large, very soft brush at around 40-60% opacity. Select the Layer Mask that comes with the Curves Adjustment Layer and begin to manually paint out some areas where it is too dark. Essentially what we are doing here is creating a vignette, but with more precision and control. It should look like this. Note the Curves mask.

Step 4
The last thing we will do is add a bit of sharpening. Press Command/Ctrl-Option-Shift-E to make a copy of all the layers merged together. Make sure this layer is moved to the top. Name this layer sharpen.
Step 5
Go to Filter > Sharpen > Unsharp Mask
Step 6
Move the amount slider to around 50-56 and a radius of 2 pixels.
Friday, September 13, 2019
10 Self- Directed Challenge
You are to choose a medium, concept, or program to challenge
yourself in a direction that you are interested in. The project is up to
you. The level of challenge is up to you, but make sure that you are
learning something that is valuable to you.
- Brainstorm- Find inspiring examples/visual ideas and post to your blog.
- Select your favorite idea- Identify what you are going to try. Make sure that you choose something that challenges you. Try something new.
- Plan your project- Write or sketch out how you are going to teach yourself how to learn the techniques. Write a proposal about what you are hoping to learn and achieve throughout this project. Note how challenging you think it is for you (maybe on a scale from 1 to 10).
- Research ways to do the project. Find a tutorial or steps to try.
- Post tutorial web address(es), rate the tutorial. How was it useful for you?
- Start your project.
- Describe your process- write notes while you are learning the program/how to do or teach others. Post an update of your progress each class.
- Post your finished work.
- Reflect on your process.
- Teach others how to do the techniques.
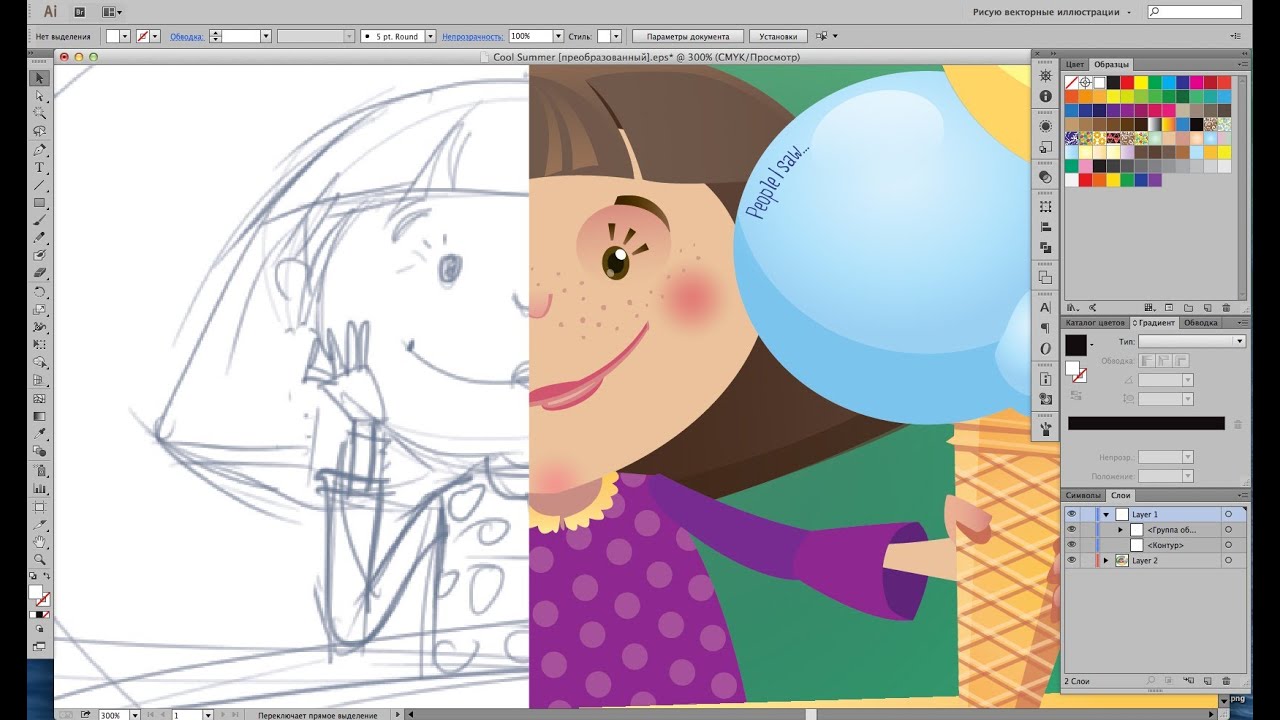
Illustrator
 |
| Photoshop |
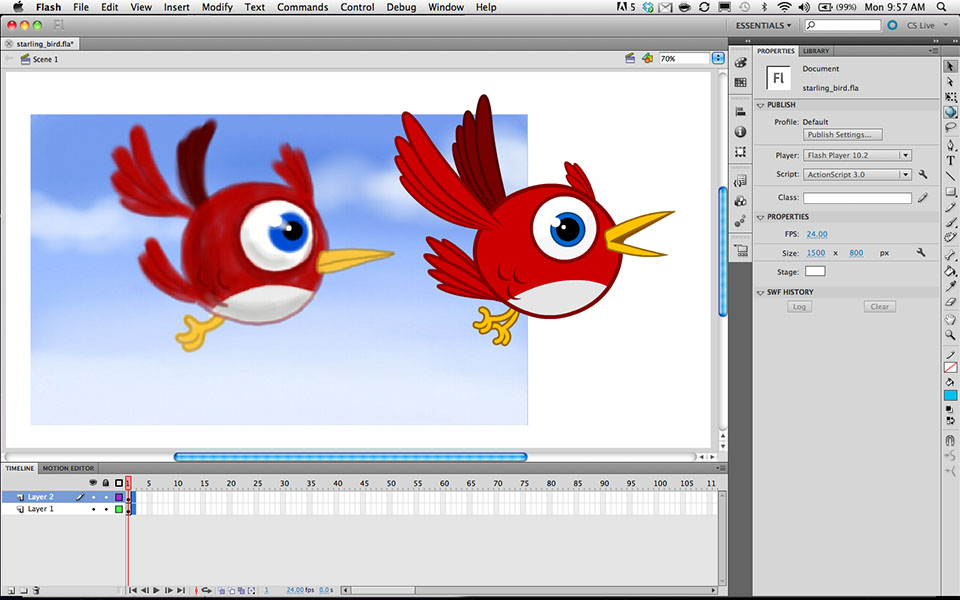 |
| Animate |
Thursday, September 5, 2019
Illustrator Norval Morrisseau
 Norval Morrisseau was an Anishinaabe Aboriginal Canadian artist.
Best known for his paintings of mythical tableaux, his narrative works
of figures and animals were painted in vibrant, fluorescent colors
featuring thick black outlines akin to stained glass windows or
woodcuts. “These paintings only remind you that you're an Indian. Inside
somewhere, we're all Indians,” the self-taught artist once said. “So
now when I befriend you, I'm trying to get the best Indian, bring out
that Indianness in you to make you think that everything is sacred.”
Born on March 14, 1932, in Beardmore, Ontario, he achieved widespread
national success throughout his artistic career, garnering major
commissions such as a large mural created for Expo 67 in 1967, which
expressed the political dissatisfaction of the First Nations People of
Canada. Morrisseau also regularly exhibited and sold his work in various
Canadian galleries until his death in Toronto on December 4, 2007.
Today, his work can be found in the collections of the Royal Ontario
Museum, the National Gallery of Canada, the Dennos Museum Center, and
the Art Gallery of Windsor, among many others.
Norval Morrisseau was an Anishinaabe Aboriginal Canadian artist.
Best known for his paintings of mythical tableaux, his narrative works
of figures and animals were painted in vibrant, fluorescent colors
featuring thick black outlines akin to stained glass windows or
woodcuts. “These paintings only remind you that you're an Indian. Inside
somewhere, we're all Indians,” the self-taught artist once said. “So
now when I befriend you, I'm trying to get the best Indian, bring out
that Indianness in you to make you think that everything is sacred.”
Born on March 14, 1932, in Beardmore, Ontario, he achieved widespread
national success throughout his artistic career, garnering major
commissions such as a large mural created for Expo 67 in 1967, which
expressed the political dissatisfaction of the First Nations People of
Canada. Morrisseau also regularly exhibited and sold his work in various
Canadian galleries until his death in Toronto on December 4, 2007.
Today, his work can be found in the collections of the Royal Ontario
Museum, the National Gallery of Canada, the Dennos Museum Center, and
the Art Gallery of Windsor, among many others.
Borrowed from:


Pen Tool Tutorial
Pen Tool Tutorial

The Path Tool will be the hardest tool to learn in Illustrator. It usually take weeks to learn and beginners always end up in frustration while figuring how it works. So don’t give up and practice it every day and soon you will be able to draw any shape.
The Path Tool will be the hardest tool to learn in Illustrator. It usually take weeks to learn and beginners always end up in frustration while figuring how it works. So don’t give up and practice it every day and soon you will be able to draw any shape.
Drawing Straight Lines
Select the Pen Tool and click once to add the first anchor point. Move your mouse to the next position and click again to create the second point. The two anchor points will be connected together. Continue doing this to create a W shape as shown.To draw a new line, click the Selection Tool(The Black Arrow Icon) and click back the Pen Tool again.

Closing a Path
To close a path, click back the starting point to close the shape.

Drawing a Curved Line
Click and drag to put out the handles to create a smooth anchor point.

Changing Path Directions
Click and drag to create a smooth anchor point. Without releasing your mouse, hold Alt/Option and drag the handle up to change the path direction.

Drawing a Circular Path
Click and drag to create a smooth anchor point. Continue adding points and click back the starting point to close the path.

Adding Anchor Points
With the Pen Tool selected, go near the path where you want to add a new anchor point. A plus sign will appear next to the pen, click on the path to create a new anchor point.

Removing Anchor Points
To remove point, move your Pen Tool close to an anchor. A minus sign will appear next to the pen. Click on the anchor point to delete it.

Converting Anchor Points
To convert a smooth anchor point to a sharp anchor point, move your Pen Tool near the anchor and hold Alt/Option and your Pen Tool will change to an arrow shape. Click on the smooth anchor to convert it to an anchor point. Click and drag on the anchor point again to change it back to a smooth anchor point.

Moving Anchor Points
Select the Direct Selection Tool and click and on anchor you want to move. Click and drag to change positions.

Changing Anchor Directions
With the Pen Tool, you can quickly change the anchor directions. Hold Ctrl/Command to quickly change the Pen Tool to Direction Selection Tool. Select the anchor point you want to edit. The anchor handle will appear. Now release Ctrl/Command and hold Alt/Option to change it to Convert Anchor Tool. Click and drag the handles to change the direction.

Drawing an Old Key
After learning the concepts of how the Pen Tool works, we will apply what you have learnt to create this ancient old key shape. For the right angles, hold Shift before adding anchor point to constrain it to 90-degree.


Final Illustration
This is the final illustration.

Tips for Using Pen Tool
- Use as little anchor points your need to create your shape
- Add anchor points where there is a change in direction of the line/curve
- Use shortcuts like Alt/Option or Ctrl/Command to quickly swap to other tools to edit your path
- Hold shift to lock your path while adding new anchor point for 45-degree increments.
More Training for Pen Tool
Here are some more exercises for tracing using Pen Tool. Save it to your desktop and place it in illustrator by going to File>Place. Select the image and make sure Template is ticked. The image will now be faded and placed as a template. Now you can start practicing...


Subscribe to:
Posts (Atom)